新建功能包并编写发布者节点
创建功能包
打开一个新的终端并加载 ROS2,导航到创建的ros2_ws目录。
在 src 目录中创建功能包(不是工作空间的根目录)。 因此,导航到ros2_ws/src,并运行创建功能包命令:
ros2 pkg create --build-type ament_cmake --license Apache-2.0 cpp_pubsub
终端将返回一条消息,确认功能包cpp_pubsub及其所有必要的文件和文件夹的创建。
导航到 ros2_ws/src/cpp_pubsub/src。这是任何CMake功能包中包含可执行文件的源文件所在的目录。
编写发布者节点
本节将详细介绍如何使用 C++ 实现一个完整的 ROS2 发布者节点,步骤可分为六个关键阶段,如图 3 所示。这些步骤为初学者提供了清晰的指导,帮助你逐步掌握发布者节点的开发过程。
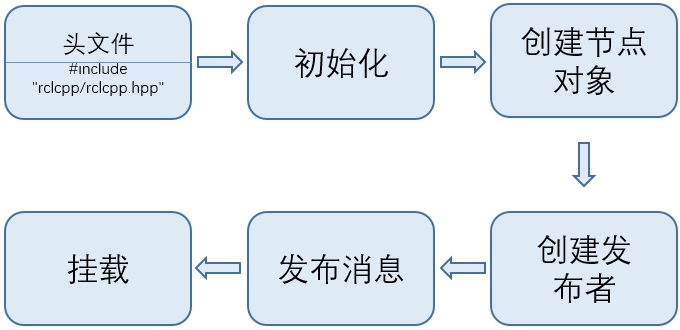
图 3: ROS2 创建发布者节点的步骤
下面这段代码实现了如何基于上述六个步骤编写一个发布者实例,该代码段用来显示编写发布者节点需要的步骤:
#include "rclcpp/rclcpp.hpp"
#include "std_msgs/msg/string.hpp" //加载头文件

int main(int argc, char * argv[])
{
    rclcpp::init(argc, argv); //初始化节点
    auto node = rclcpp::Node::make_shared("simple_publisher");//创建节点
    auto publisher = node->create_publisher<std_msgs::msg::String>("topic", 10);//创建发布者

    int count = 0;

    // 使用定时器发布消息,每 1 秒执行一次
    auto timer = node->create_wall_timer(
        std::chrono::seconds(1),
        [publisher, &count]() {
            auto message = std_msgs::msg::String();
            message.data = "Hello ROS 2! Count: " + std::to_string(count++);
            publisher->publish(message);
            RCLCPP_INFO(rclcpp::get_logger("simple_publisher"), "Publishing: '%s'", message.data.c_str());
        });

    rclcpp::spin(node);//挂载节点
    rclcpp::shutdown();
    return 0;
}
在实际开发中,采用基于类模板的方式编写发布者更为常见,因为类结构能够提供更高的灵活性和可维护性。与直接在 main 函数中实现逻辑相比,基于类的实现方式更有利于组织代码、处理复杂控制流程,并且便于在同一节点中集成多个发布者或订阅者。下面将展示如何使用类模板编写一个 ROS2 发布者。
使用 VS Code 打开 ROS2 工作空间 ros2_ws,并在资源管理器中定位到路径:
ros2_ws/src/cpp_pubsub/src
在该目录下新建一个文件,命名为 publisher_member_function.cpp。然后,将下面的发布者示例代码完整复制并粘贴到该文件中,保存文件。代码如下:
#include <chrono>
#include <memory>
#include <string>

#include "rclcpp/rclcpp.hpp"
#include "std_msgs/msg/string.hpp"

using namespace std::chrono_literals;

class MinimalPublisher : public rclcpp::Node
{
public:
  MinimalPublisher(): Node("minimal_publisher"), count_(0)
  {
    publisher_ = this->create_publisher<std_msgs::msg::String>("topic", 10);
    auto timer_callback =
      [this]() -> void {
        auto message = std_msgs::msg::String();
        message.data = "Hello, world! " + std::to_string(this->count_++);
        RCLCPP_INFO(this->get_logger(), "Publishing: '%s'", message.data.c_str());
        this->publisher_->publish(message);
      };
    timer_ = this->create_wall_timer(500ms, timer_callback);
  }

private:
  rclcpp::TimerBase::SharedPtr timer_;
  rclcpp::Publisher<std_msgs::msg::String>::SharedPtr publisher_;
  size_t count_;
};

int main(int argc, char * argv[])
{
  rclcpp::init(argc, argv);
  rclcpp::spin(std::make_shared<MinimalPublisher>());
  rclcpp::shutdown();
  return 0;
}
1. 代码说明
#include <chrono>
#include <functional>
#include <memory>
#include <string>

#include "rclcpp/rclcpp.hpp"
#include "std_msgs/msg/string.hpp"

using namespace std::chrono_literals;
代码顶部包括了标准C++头文件。 在标准C++头文件之后是rclcpp/rclcpp.hpp库,它允许用户使用 ROS2 系统的最常见基础功能。 最后是 std_msgs/msg/string.hpp,它包括了用来发布数据的内置消息类型。
class MinimalPublisher : public rclcpp::Node {
  // ...
};
上面这行代码通过继承rclcpp::Node的节点类MinimalPublisher。 代码中的每个this都指向该节点。
public:
    MinimalPublisher(): Node("minimal_publisher"), count_(0)
  {
    publisher_ = this->create_publisher<std_msgs::msg::String>("topic", 10);
    auto timer_callback =[this]() -> void {
        auto message = std_msgs::msg::String();
        message.data = "Hello, world! " + std::to_string(this->count_++);
        RCLCPP_INFO(this->get_logger(), "Publishing: '%s'", message.data.c_str());
        this->publisher_->publish(message);
      };
    timer_ = this->create_wall_timer(500ms, timer_callback);
  }
上面的构造函数将节点命名为 minimal_publisher,并将 count_ 初始化为 0。在构造函数内部,发布者被初始化为 String 消息类型,话题名为 topic,并设置了所需的队列大小,以便在消息堆积时进行限制。
接着,声明了一个名为 timer_callback 的 lambda 函数。它通过引用捕获当前对象 this,不接受任何输入参数,并返回 void。该 timer_callback 函数会创建一个新的 String 类型的消息,设置其数据字段为目标字符串并将其发布。
RCLCPP_INFO 宏用于确保每条发布的消息都会打印在控制台上。最后,timer_ 被初始化,这会使 timer_callback 函数以每秒两次的频率被执行。
rclcpp::TimerBase::SharedPtr timer_;
rclcpp::Publisher<std_msgs::msg::String>::SharedPtr publisher_;
size_t count_;
在类声明的最后是声明计时器、发布者和计数器字段。
int main(int argc, char **argv) {
  rclcpp::init(argc, argv);
  rclcpp::spin(std::make_shared<MinimalPublisher>());
  rclcpp::shutdown();
  return 0;
}
在MinimalPublisher类之后是main函数,节点实际执行的地方。 rclcpp::init初始化 ROS2,rclcpp::spin 开始处理来自节点的数据,包括计时器的回调。
2. 添加依赖项XML
导航回 ros2_ws/src/cpp_pubsub 目录,编辑 CMakeLists.txt 和 package.xml。
使用文本编辑器打开 package.xml ,填写 <description> 、 <maintainer> 和 <license> 标签:
<description>Examples of minimal publisher/subscriber using rclcpp</description>
<maintainer email="you@email.com">Your Name</maintainer>
<license>Apache License 2.0</license>
在ament_cmake构建工具依赖项后添加新行,并添加以下依赖项:
<depend>rclcpp</depend>
<depend>std_msgs</depend>
这些内容声明了功能包在构建和执行代码时需要 rclcpp和 std_msgs 功能包,编辑完成后保存文件。
3. 编辑 CMakeLists.txt
现在打开 CMakeLists.txt 文件, 在现有的依赖项 find_package(ament_cmake REQUIRED) 下方,添加以下行:
find_package(rclcpp REQUIRED)
find_package(std_msgs REQUIRED)
在此之后,添加可执行文件并将其命名为 talker ,以便可以使用 ros2 run 运行节点:
add_executable(talker src/publisher_member_function.cpp)
ament_target_dependencies(talker rclcpp std_msgs)
一般情况下还要添加如下头文件相关的路径
target_include_directories(talker PUBLIC
  $<BUILD_INTERFACE:${CMAKE_CURRENT_SOURCE_DIR}/include>
  $<INSTALL_INTERFACE:include>)
其中<BUILD_INTERFACE:${CMAKE_CURRENT_SOURCE_DIR}/include>表示编译时的头文件路径,他的具体路径为和本功能包CMakeLists.txt文件同级的include文件夹,<INSTALL_INTERFACE:include>表示安装时头文件路径,它的具体路径为工作空间下的include文件夹(ros2_ws/install/include)。最后,添加install(TARGETS...)部分,以便ros2 run可以找到可执行文件:
install(TARGETS
  talker
  DESTINATION lib/${PROJECT_NAME})
上述命令会将 talker 可执行程序安装在 ros2_ws/install/lib/cpp_pubsub 中,${PROJECT_NAME}就是功能包的名称。
完整的 CMakeLists.txt 如下所示:
cmake_minimum_required(VERSION 3.8)
project(cpp_pubsub)

if(CMAKE_COMPILER_IS_GNUCXX OR CMAKE_CXX_COMPILER_ID MATCHES "Clang")
  add_compile_options(-Wall -Wextra -Wpedantic)
endif()

# find dependencies
find_package(ament_cmake REQUIRED)
find_package(rclcpp REQUIRED)
find_package(std_msgs REQUIRED)

add_executable(talker src/publisher_member_function.cpp)
ament_target_dependencies(talker rclcpp std_msgs)

target_include_directories(talker PUBLIC
  $<BUILD_INTERFACE:${CMAKE_CURRENT_SOURCE_DIR}/include>
  $<INSTALL_INTERFACE:include>)

  install(TARGETS
  talker
  DESTINATION lib/${PROJECT_NAME})

if(BUILD_TESTING)
  find_package(ament_lint_auto REQUIRED)

  set(ament_cmake_copyright_FOUND TRUE)

  set(ament_cmake_cpplint_FOUND TRUE)
  ament_lint_auto_find_test_dependencies()
endif()

ament_package()
完成上述配置后可以构建功能包了。
4. 构建和运行
在构建之前,在工作空间的根目录(ros2_ws)中运行 rosdep 可以避免因却乏依赖项导致的错误(可选,若出现错误可以通过更换源或者网络)
rosdep install -i --from-path src --rosdistro jazzy -y
如果没有这个工具可以使用下面命令进行安装:
sudo apt install python3-rosdep
rosdep update
仍然在工作空间的根目录 ros2_ws 中,构建新的功能包:
colcon build --packages-select cpp_pubsub
打开一个新的终端,导航到 ros2_ws,并加载设置文件:
source install/setup.bash
现在运行talker可执行程序:
ros2 run cpp_pubsub talker
终端应该开始每0.5秒发布一次信息消息,如下所示:
[INFO] [minimal_publisher]: Publishing: "Hello World: 0"
[INFO] [minimal_publisher]: Publishing: "Hello World: 1"
[INFO] [minimal_publisher]: Publishing: "Hello World: 2"
[INFO] [minimal_publisher]: Publishing: "Hello World: 3"
[INFO] [minimal_publisher]: Publishing: "Hello World: 4"
关闭节点可以按Ctrl+c。